2013/11/18

DHCP [Server] di debian 6 Squeeze


1. Pastikan
Login
sebagai
Root

idris@debian:~$
su

Password:


root@debian:~#
whoami

root

root@debian:~#


2. Persiapan
Repository

Pastikan
Repositorynya

root@debian:~#
cat
/etc/apt/sources.list

deb
ftp://kebo.eepis­its.edu/debian
squeeze
contrib
main
non­free

deb­src
ftp://kebo.eepis­its.edu/debian
squeeze
contrib
main
non­free

root@debian:~#

Jika
belum
edit
menggunakan
editor
seperti:
vim,
nano,
pico,
atau
lainnya.

3. Update
repository

root@debian:~#
apt­get
update

Get:1
ftp://kebo.eepis­its.edu
squeeze
Release.gpg
[1672B]

Get:2
ftp://kebo.eepis­its.edu
squeeze/contrib
Translation­en_US

Get:3
ftp://kebo.eepis­its.edu
squeeze/main
Translation­en_US

Get:4
ftp://kebo.eepis­its.edu
squeeze/non­free
Translation­en_US

Hit
ftp://kebo.eepis­its.edu
squeeze
Release

Get:5
ftp://kebo.eepis­its.edu
squeeze
Release
[104kB]

Get:6
ftp://kebo.eepis­its.edu
squeeze/contrib
Packages/DiffIndex

Hit
ftp://kebo.eepis­its.edu
squeeze/contrib
Packages

Fetched
105kB
in
13s
(7586B/s)


Reading
package
lists...
Done

4. Pastikan
paket
DHCP‐nya

root@debian:~#
apt­cache
search
isc­dhcp­server

isc­dhcp­server
­
ISC
DHCP
server
for
automatic
IP
address
assignment

isc­dhcp­server­dbg
­
ISC
DHCP
server
for
automatic
IP
address
assignment
(debug)

isc­dhcp­server­ldap
­
DHCP
server
able
to
use
LDAP
as
backend


5. Installasi
paket
DHCP

root@debian:/home/idris#
apt­get
install
isc­dhcp­server

Reading
package
lists...
Done

Building
dependency
tree


Reading
state
information...
Done

Suggested
packages:


isc­dhcp­server­ldap

The
following
NEW
packages
will
be
installed:


isc­dhcp­server

0
upgraded,
1
newly
installed,
0
to
remove
and
0
not
upgraded.

Need
to
get
377
kB
of
archives.

After
this
operation,
885
kB
of
additional
disk
space
will
be
used.

Get:1
http://kebo.vlsm.org/debian/
squeeze/main
isc­dhcp­server
i386
4.1.1­P1­
15+squeeze2
[377
kB]

Fetched
377
kB
in
0s
(5,513
kB/s)


Preconfiguring
packages
...

Selecting
previously
deselected
package
isc­dhcp­server.

(Reading
database
...
24047
files
and
directories
currently
installed.)

Unpacking
isc­dhcp­server
(from
.../isc­dhcp­server_4.1.1­P1­
15+squeeze2_i386.deb)
...

Processing
triggers
for
man­db
...

Setting
up
isc­dhcp­server
(4.1.1­P1­15+squeeze2)
...

Generating
/etc/default/isc­dhcp­server...

Starting
ISC
DHCP
server:
dhcpdcheck
syslog
for
diagnostics.
...
failed!


failed!

invoke­rc.d:
initscript
isc­dhcp­server,
action
"start"
failed.

6. Edit
File
konfigurasi
/etc/dhcp/dhcpd.conf

Tambah
Subnet
network
anda

root@debian:/home/idris#
vim
/etc/dhcp/dhcpd.conf

subnet
10.252.108.0
netmask
255.255.255.0
{


range
10.252.108.10
10.252.108.50;


option
routers
10.252.108.1;

}

7. Restart
Service
DHCP‐nya

root@debian:/home/idris#
/etc/init.d/isc­dhcp­server
restart

Stopping
ISC
DHCP
server:
dhcpd
failed!

Starting
ISC
DHCP
server:
dhcpd.

root@debian:/home/idris#
8. Uji
cobakan
di
komputer
client
Read More ->>

2013/11/16

INSTALASI UBUNTU SERVER, DNS SERVER, MAIL SERVER

PELATIHAN KE-2:

INSTALASI UBUNTU SERVER, DNS SERVER, MAIL SERVER


Kegiatan awal adalah melakukan instalasi OS Ubuntu server 8.04 ditambah Linux Apache Mysql Php (LAMP) dan Postfix mail server

Ikuti petunjuk ini secara berurutan, dan ganti xxx dengan nama kampus anda

  1. Cabut kabel LAN (yang dicabut ujung di PC). Tujuannya instalasi cepat dan tidak melakukun update. Disamping itu agar IP dapat dimasukkan secara manual.
  2. Masukkan CD Ubuntu Server 8.04  saat booting tekan esc dan pilih boot dari dvd driver
3.   Pilih English untuk bahasa instalasi <enter>
  1. Install ubuntu server <enter>
  2. Pilih English untuk … <enter>
  3. Pilih Other <enter>
  4. Scroll down → pilih Indonesia
  5. Pilih No
  6. Keyboard Layout pilih USA
  7. Pilih USA ….
  8. Masukkan hostname sesuai daftar
Contoh : k-unud.ac.id → continue
  1. Untuk city zone pilih makassar
  2. Pilih guided – use entire disk
  3. “partition write the change “ Pilih yes
  4. Pilih scsi 0.0.0
  5. Pilih yes
  6. Masukkan Full name : inherent
  7. Password : inherent
  8. Re-enter password
  9. Untuk http proxy di kosongkan → continue
  10. Pilih paket instalasi
    1. DNS Server
    2. LAMP Server
    3. Mail Server
    4. Open SSH Server
  11. → Continue
  12. Masukkan inherent password mysql untuk “user root” → continue
  13. Re-enter password
  14. Postfix configuration pilih internet site
  15. Systim mail name : xxx.ac.id. → continue
  16. Installation complete → keluarkan cd → continue
  17. Rebooting


Konfigurasi DNS

  1. Edit  file /etc/bind/named.conf.local
Unutk editor bias menggunakan vi atau nano.

Cd  /etc/bind/
Cat named.conf  >> named.conf.local

Nano named.conf.local. Lihat pada configurasi file ini pada halaman belakang


  1. cp db.local xxx.ac.id
edit sehingga nampak sebagai berikut:
            ;
; BIND data file for local loopback interface
;
$TTL     604800
@ IN      SOA     ns.kampusb.ac.id. root.kampusb.ac.id. (
               2008110401       ; Serial
                  604800        ; Refresh
                   86400        ; Retry
                 2419200        ; Expire
                  604800 )      ; Negative Cache TTL
;
@ IN      NS      kampusb.ac.id.
@ IN      A       192.168.30.58
www      IN      CNAME   @
@ IN      MX      10 @


  1. cp db.127 192.168.30.in-addr.arpa


  1. Buat file baru dengan nama file sesuai hostname anda contoh xxx.ac.id
nano /etc/bind/xxx.ac.id, dan ketik:

;
; BIND data file for local loopback interface
;
$TTL   604800
@        IN        SOA    ns.kampusb.ac.id. root.kampusb.ac.id. (
                              2008110401          ; Serial
                                     604800                       ; Refresh
                                      86400                        ; Retry
                                    2419200                      ; Expire
                                     604800 )         ; Negative Cache TTL
;
@        IN        NS       kampusb.ac.id.
@        IN        A         192.168.30.58
www   IN        CNAME         @
@        IN        MX      10 @


  1. Restart dns server
/etc/init.d/bind9 restart

  1. Test dns server
Nslookup
> server xxx.ac.id
   result 
> yahoo.com
   result

atau dig xxx.ac.id


Konfigurasi mail server

  1. cd /etc/postfix
  2. edit main.cf
  3. pastikan anda sudah terhubung ke Internet
  4. Update repository 
apt-get update
Update ini bias tanpa link Internet bila memiliki DVD reposetori yang lengkap.

Apt-get install dovecot

Apt-get install nmap


Read More ->>

Configuring the Network

Configuring the Network

Since the network is automatically configured during the initial installation, the /etc/network/interfaces file already contains a valid configuration. A line starting with auto gives a list of interfaces to be automatically configured on boot. This will often be eth0, which refers to the first Ethernet card.

8.2.1. Ethernet Interface

If the computer has an Ethernet card, the network that is associated with it must be configured by choosing from one of two methods. The simplest method is dynamic configuration with DHCP, and it requires a DHCP server on the local network. It may indicate a desired hostname, corresponding to the hostname setting in the example below. The DHCP server then sends configuration settings for the appropriate network.
Example 8.1. DHCP configuration
auto eth0
iface eth0 inet dhcp
  hostname arrakis

A “static” configuration must indicate network settings in a fixed manner. This includes at least the IP address and subnet mask; network and broadcast addresses are also sometimes listed. A router connecting to the exterior will be specified as a gateway.
Example 8.2. Static configuration
auto eth0
iface eth0 inet static
  address 192.168.0.3
  netmask 255.255.255.0
  broadcast 192.168.0.255
  network 192.168.0.0
  gateway 192.168.0.1

8.2.2. Connecting with PPP through a PSTN Modem

A point to point (PPP) connection establishes an intermittent connection; this is the most common solution for connections made with a telephone modem (“PSTN modem”, since the connection goes over the public switched telephone network).
A connection by telephone modem requires an account with an access provider, including a telephone number, username, password, and, sometimes the authentication protocol to be used. Such a connection is configured using thepppconfig tool in the Debian package of the same name. By default, it uses the access provider's connection. When in doubt about the authentication protocol, choose PAP: it is offered by the majority of Internet service providers.
After configuration, it is possible to connect using the pon command (giving it the name of the connection as a parameter, when the default value of provider is not appropriate). The link is disconnected with the poff command. These two commands can be executed by the root user, or by any other user, provided they are in the dip group.

8.2.3. Connecting through an ADSL Modem

The generic term “ADSL modem” covers a multitude of devices with very different functions. The modems that are simplest to use with Linux are those that have an Ethernet interface. These tend to be popular; ADSL Internet service providers lend (or lease) a “box” with Ethernet interfaces more and more frequently, instead of those with USB interfaces. According to the type of modem, the configuration required can vary widely.

8.2.3.1. Modems Supporting PPPOE

Some Ethernet modems work with the PPPOE protocol (Point to Point Protocol over Ethernet). The pppoeconf tool (from the package with the same name) will configure the connection. To do so, it modifies the /etc/ppp/peers/dsl-provider file with the settings provided and records the login information in the /etc/ppp/pap-secrets and /etc/ppp/chap-secrets files. It is recommended to accept all modifications that it proposes.
Once this configuration is complete, you can open the ADSL connection with the command, pon dsl-provider and disconnect with poff dsl-provider.

8.2.3.2. Modems Supporting PPTP

The PPTP (Point-to-Point Tunneling Protocol) protocol was created by Microsoft. Deployed at the beginning of ADSL, it was quickly replaced by PPPOE. If this protocol is forced on you, see Chapter 10, Network Infrastructure in the section about virtual private networks detailing PPTP.

8.2.3.3. Modems Supporting DHCP

When a modem is connected to the computer by an Ethernet cable (crossover cable) you typically configure a network connection by DHCP on the computer; the modem automatically acts as a gateway by default and takes care of routing (meaning that it manages the network traffic between the computer and the Internet).
In France, this method is used by Freebox, Neufbox, and Livebox, the ADSL modems provided by the Free, SFR/Neuf, and Wanadoo/Orange ISPs. It is also provided by most “ADSL routers” on the market.

8.2.4. Automatic Network Configuration for Roaming Users

Many Falcot engineers have a laptop computer that, for professional purposes, they also use at home. The network configuration to use differs according to location. At home, it may be a wifi network (protected by a WEP key), while the workplace uses a wired network for greater security and more bandwidth.
To avoid having to manually connect or disconnect the corresponding network interfaces, administrators installed thenetwork-manager package on these roaming machines. This software enables a user to easily switch from one network to another using a small icon displayed in the notification area of their graphical desktop. Clicking on this icon displays a list of available networks (both wired and wireless), so they can simply choose the network they wish to use. The program saves the configuration for the networks to which the user has already connected, and automatically switches to the best available network when the current connection drops.
In order to do this, the program is structured in two parts: a daemon running as root handles activation and configuration of network interfaces and a user interface controls this daemon. Only members of the “netdev” group have permissions to control this program.
Network Manager knows how to handle various types of connections (DHCP, manual configuration, local network), but only if the configuration is set with the program itself. This is why it will systematically ignore all network interfaces in /etc/network/interfaces for which it is not suited. The settings are very strict; details are available in the /usr/share/doc/network-manager/README.Debian file. Since Network Manager doesn't give details when no network connections are shown, the easy way is to delete from /etc/network/interfaces any configuration for all interfaces that must be managed by Network Manager.
Note that this program is installed by default when the “Desktop Environment” task is chosen during initial installation.
Read More ->>

HTTP/FTP Proxy

An HTTP/FTP proxy acts as an intermediary for HTTP and/or FTP connections. Its role is twofold:
  • Caching: recently downloaded documents are copied locally, which avoids multiple downloads.
  • Filtering server: if use of the proxy is mandated (and outgoing connections are blocked unless they go through the proxy), then the proxy can determine whether or not the request is to be granted.
Falcot Corp selected Squid as their proxy server.

11.6.1. Installing

The squid Debian package only contains the modular (caching) proxy. Turning it into a filtering server requires installing the additional squidguard package. In addition, squid-cgi provides a querying and administration interface for a Squid proxy.
Prior to installing, care should be taken to check that the system can identify its own complete name: the hostname -fmust return a fully-qualified name (including a domain). If it does not, then the /etc/hosts file should be edited to contain the full name of the system (for instance, arrakis.falcot.com). The official computer name should be validated with the network administrator in order to avoid potential name conflicts.

11.6.2. Configuring a Cache

Enabling the caching server feature is a simple matter of editing the /etc/squid/squid.conf configuration file and allowing machines from the local network to run queries through the proxy. The following example shows the modifications made by the Falcot Corp administrators:
Example 11.30. The /etc/squid/squid.conf file (excerpts)
# INSERT YOUR OWN RULE(S) HERE TO ALLOW ACCESS FROM YOUR CLIENTS

# Example rule allowing access from your local networks. Adapt
# to list your (internal) IP networks from where browsing should
# be allowed
acl our_networks src 192.168.1.0/24 192.168.2.0/24
http_access allow our_networks
http_access allow localhost
# And finally deny all other access to this proxy
http_access deny all

11.6.3. Configuring a Filter

squid itself does not perform the filtering; this action is delegated to squidGuard. The former must then be configured to interact with the latter. This involves adding the following directive to the /etc/squid/squid.conf file:
redirect_program /usr/bin/squidGuard -c /etc/squid/squidGuard.conf
The /usr/lib/cgi-bin/squidGuard.cgi CGI program also needs to be installed, using /usr/share/doc/squidguard/examples/squidGuard.cgi.gz as a starting point. Required modifications to this script are the $proxy and $proxymaster variables (the name of the proxy and the administrator's contact e-mail, respectively). The $image and $redirect variables should point to existing images representing the rejection of a query.
The filter is enabled with the /etc/init.d/squid reload command. However, since the squidguard package does no filtering by default, it is the administrator's task to define the policy. This can be done by customizing the /etc/squid/squidGuard.conf file.
The working database must be regenerated with update-squidguard after each change of the squidGuardconfiguration file (or one of the lists of domains or URLs it mentions). The configuration file syntax is documented on the following website:
Read More ->>

2013/11/15

Configurasi FTP Server di Debian 6

1. Install terlebih dahulu aplikasi yang dibutuhkan yaitu proftp dengan printah "apt-get install proftpd" seperti di bawah ini
2. Setelah terinstall setelah itu kita buat direktori untuk menyimpan file-file yang akan kita upload ke FTP. misalnya disini saya akan menempatkannya di direktori /home/share/ftp , dikarenakan direktori share dan ftp belum ada kita buat direktorinya. kita masuk ke direktori home "cd /home/" >> Enter kemudian "mkdir share" untuk membuat direktori share.
Selanjutnya kita masuk ke direktori share " cd share/" dan buat lagi direktori yaitu direktori ftp "mkdir ftp"
3. Setelah itu kita buat user untuk login ke FTP browser. Pertama "userdel ftp" kemudian "useradd ftp" (ftp=nama user) setelah itu buat password dengan cara "passwd ftp" kemudian masukan password sahabat blogger.

4. Setelah itu ubah permision pada  direktori FTP menjadi 777 sehingga dapat upload dan download secara bebas. Hal yang perlu di ingat kita harus berada di direktori share . nah baru kita ketikan perintah "chmod 777 ftp"
5. setelah itu kita tinggal edit file proftpd.conf dengan printah "pico /etc/proftpd/proftpd.conf
 6. Setelah itu sahabat  blogger pergi ke baris yang paling bawah dan tambahkan script di bawah ini :
<Anonymous /home/share/ftp>
User         ftp
</Anonynous>
catatan : /home/share/ftp bisa diganti jika sahabat menempatkannya di direktori yang lain. ftp nama user yang tadi dibuat.


7. Setelah itu save file tadi "CRTL+X >> Y >> Enter" . Setelah di save restart proftpd dengan cara "/etc/init.d/proftpd restart
8. Setelah di restart kita cek dengan printah "ftp localhost" >> Enter. masukan user dan password yang sudah sahabat blogger buat tadi.
9. Coba kita ketikan printah "ls" untuk melihat file apa saja yang ada di FTP server kita. maka akan terlihat kosong dikarenakan kita belum upload atau membuat file pada direktori FTP tadi. 
10. Kita coba untuk membuat file kosong di direktori FTP dengan cara "touch namafile.formatfile" misal disini saya buat beberapa file dengan extention berbeda.Catatan kita harus berada di direktori FTP pada saat membuat file.
11. kita coba cek kembali "ftp localhost" masukan user dan passwd dan coba di "ls" maka akan terlihat file yang telah kita buat tadi.

12. Nah jika tampil seperti itu maka konfigurasi yang sahabat blogger lakukan sudah sukses. Namun untuk memastikannnya kita hubungkan dengan client dan coba cek dari browser client dengan mengetikan "ftp.domainkita.net" misal disini domain saya "suhendar.net" maka ketikan "ftp.suhendar.ne" jika berhasil disana akan muncul jendela login dan file-file yang sudah kita buat.
Read More ->>

2013/11/14

configurasi Web server di Debian 6

Jangan Lupa Tinggalkan Komentar Kalian Ya...!!!

1. masuk ke system linux debian 6
2. setting jaringan lihat DI SINI 
3. edit repository dengan cara sebgai berikut:
    - masuk ke terminal
    - ketikkan "su" dan masukkan pasword lalu enter
    - kemudian ketikkan "nano /etc/apt/sources.list"
    - kemudian hapus tanda # yang ada tulisan security
    - tekan ctrl+x lau tekan Y kemudian enter
4. kemudian update linux debian 6 dengan cara ketik di terminal "apt-get update" lalu enter
5. install apache2 dengan cara ketik di terminal "apt-get install apache2" lalu tekan Y kemudian enter
6. restart apache2 dengan cara ketik di terminal "/etc/init.d/apache2 restart" lalu enter
7. lalu cek server di browser dengan cara ketik ip address di browser, jika berhasil maka muncul tulisan         "itswork"
8. edit index.html sesuka anda dengan cara ketik di terminal "nano /var/www/index.html" kemudi save dengan cara tkan ctrl+x lalu tekan Y kemudian enter
9. cek web server di browser
Read More ->>

Setting Dns Server di Debian 6 lengkap

DNS (Domain Name Server) bekerja pada konsep client server. Ketika komputer client meminta informasi IP Address suatu  hostname ke nameserver, biasanya melalui port 53. kemudian nameserver mencoba menterjemahkan berdasarkan library resolv-nya.

Fungsi DNS menerjemahkan nama domain menjadi deretan angka IP. Contohnya bila kita akan membuka atau merequest url Domain tertentu, biasanya kita menggunakan deretan nama atau huruf karena lebih mudah dihafal seperti google.com, yahoo.com , facebook.com dan sebagainya.


Langkah-langkahnya sebagai berikut: 


1. Masuk ke system operasi Linux
2. Kemudian masukkan DVD Debian , karena semua paket software debian terdapat pada DVD atau agan dapat mendownload softwarenya melalui website debian, 


3. Pilih Application -> Accessories -> Root Terminal


4. Masukkan Root Password
5. Tekan enter


6. Muncul tampilan terminal


7. Langsung agan ketikkan apt-cdrom add


8. Setelah berhasil membaca dvd debian 6


9. Agan ketikkan apt-get install bind9


10. Ketik y


11. Agan ketikkan nano /etc/bind/db.local


12. Tampilan awal dari file db.local


13. Ganti nama localhost menjadi nama domain yang agan miliki, edit dan tambahkan beberapa script diantaranya: server, www, ftp, mail, proxy. Sesuaikan juga nomor IP yang agan gunakan
14. Tekan ctrl+x


15. Ketik y


16. Tekan enter


17. Agan ketikkan nano /etc/bind/db.127


18. Tampilan awal dari file db.127


19. Ganti nama localhost menjadi nama domain yang agan miliki, sesuaikan juga nomor IP yang agan gunakan
20. Tekan ctrl+x


21. Ketik y


22. Tekan enter


23. Agan ketikkan lagi nano /etc/bind/named.conf.local


24. Tampilan awal dari file named.conf.local


25. Tambahkan script seperti pada gambar di atas, ganti nama localhost menjadi nama domain yang agan miliki, sesuaikan juga nomor IP yang agan gunakan
26. Tekan ctrl+x


27. Ketik y


28. Tekan enter


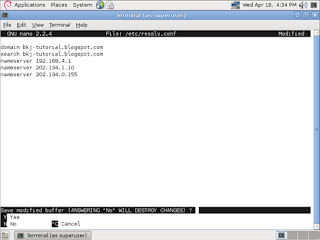
29. Langkah selanjutnya agan ketikkan lagi nano/etc/resolv.conf


30. Tampilan awal dari file resolv.conf


31. Tambahkan script dengan mengetikkan domain bkj-tutorial.blogspot.com, nameserver 202.134.1.10, nameserver 202.134.0.155. bkj-tutorial.blogspot.com dapat diganti dengan domain yang agan miliki202.134.1.10 dan 0.155 adalah nameserver dari telkom.Sesuaikan juga nomor IP yang agan gunakan 
32. Tekan ctrl+x


33. Ketik y


34. Tekan enter


35. Untuk langkah terakhir restart paket bind9 dengan mengetikkan /etc/init.d/bind9 restart


36. Restart berhasil


37. Lakukan perintah ping untuk mengecek DNS kita dengan mengetikkan ping bkj-tutorial.blogspot.combkj-tutorial.blogspot.com diganti dengan domain yang agan miliki


38. Jika berhasil maka muncul pesan 64 bytes from...dst, untuk menghentikan perintah ping yang muncul terus tekan ctrl+c


39. Apabila ingin melihat DNS yang  kita miliki ketik nslookup bkj-tutorial.blogspot.com,bkj-tutorial.blogspot.com diganti dengan domain yang agan miliki


40. Hasil dari perintah nslookup tadi dan kita telah berhasil menginstall dan mengkonfigurasi DNS.
Read More ->>

Proxy

Powered By Blogger

Total Tayangan Halaman

Diberdayakan oleh Blogger.

instalasi ubuntu

instalasi ubuntu
instalasi Ubuntu Lengkap

instalasi Debian_proxy_router